The Ukrainian Irishman: A Rough Tutorial on Lining a Knitted Hoody
 My goal for this 2013/2014 winter season was to provide my youngest with an entirely hand-made wardrobe. I was so excited. All summer long I shopped sales, used coupons, and placed co-op orders to get everything I could possibly need at the best possibly prices. While his fancy sets of wool pants and
 matching embellished lap tees were SO fun and get him oodles of ooh's and aah's everywhere we go (and everywhere I brag them online :giggle: ), my special prized piece is his winter jacket. I planned it first and searched for the supplies for months. I had two of the three skeins of worsted Peace Fleece in Ukrainian Red needed in my stash, and searched high and low for a third without resorting to retail. I support the company, but the shipping for one skein costing more than the skein itself defeated the purpose of my frugal wardrobe mission. Finally I found a kind woman on Ravelry with the skeins I needed, and she sold them to me at a serious bargain to boot. I could've hugged her. (Thanks again, michellerene!!!)
 |
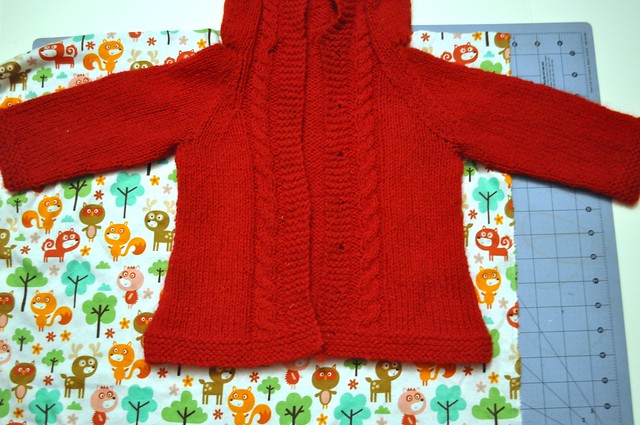
| Step 1: Knit the sweater |
So on the tutorial of sorts. Step 1: Knit the sweater. I followed the size 12-18 months pattern, with a few modifications to make it the way I wanted. The design is knit from the bottom up and very different from any other sweater pattern I've followed. It was fun to try something new. Unfortunately I did not notice there was an error in the numbers of this size until I was too far into the raglan decreases and nearly to the hood so it was unfixable. Thankfully, no one has noticed but me and the few knitters I've pointed out the error to. I'm sure knitters can spot it in the picture to the left, if they try. :giggle:
 |
| Step 3: Cut the body lining |
Step 3: Cut the body lining. I laid the desired lining fabric on my cutting mat, then laid the blocked garment on top, then cut the body shape out with a 1/2-inch seam allowance, tracing(then cutting after moving the garment) the raglan line with the same allowance.

Step 4: Cut the sleeve and hood linings. Lay the blocked garment on the appropriate fabrics and cut with a 1/2-inch seam allowance just as you did the body.
Keep in mind, however, with the sleeves that you can fold the fabric in half so there's only one seam, and on that side you do not need a seam allowance.
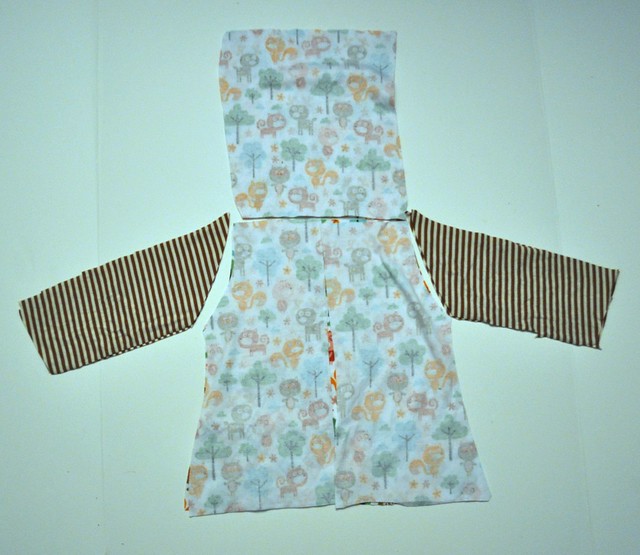
All your pieces should now be cut out.
Step 5: Sew all your lining pieces together at the seams. It will be obvious what goes together wear. Just lay it out flat and sew up the seams. Remember to sew it inside out because odds are you want the print to show inside the jacket.
When you're done, you should be able to turn it right side out and see a jacket pretty much identical in shape and proportions to the knitted one.
 |
| Step 5: Sew all the lining pieces together |
Making sure the lining is inside out, push the sleeves into the sleeves, the hood into the hood, and pin it along key seams that will keep it lined up. I turned the 1/2-inch allowance under at the hems and cuffs, and using thread that matched the yarn color, I sewed along key seams and stress points: the cuffs, the hem, all the way around the button band and hood border, as well as at the top seam of the hood and the back of the neck.
 Make sure when you sew up along the button band you are not covering the button holes! I sewed JUST beside them and used the line of button holes to guide the very edge of my presser foot.
Step 7: Attach the buttons. I chose so inexpensive buttons made of coconut, of all things, that I'd found on sale. They were the perfect little contrast to the red of the sweater, but matched the browns of the inner.
 Step 8: PUT IT ON! Lasso the little chubster your creation is made for and give it a test run. Then try to take photos for Ravelry and Facebook while he laughs at you, finds a scrap of paper to chew on, and just in general tries really hard NOT to cooperate with your process.
TOTAL COST: $18.00 in yarn, $6.00 in fabric, $1.50 in buttons
TOTAL TIME: A week of spare knitting time and an hour to do the lining
Seeing my Badger Boy wear the coat all winter long that I brainstormed over for months and put my heart and soul into: PRICELESS!!!


Comments
Post a Comment